http://docs.oracle.com/javase/tutorial/uiswing/layout/card.html
can be followed easily. When it comes to Netbeans, I couldnt figure out how to use the panels within a frame and how to get it to work properly. This post will be try to teach you the following steps on how to get CardLayout working for a specific panel. Hopefully, this guide will be beneficial to the readers.
The basic steps in creating CardLayout in Netbeans are:
1) Create a Main Panel in which to hold other panels for the CardLayout
2) Create several panels within this Main Panel
3) insert code so that when a button or an action is generated, the panels are swapped
The more elaborate steps are as follow: (Note: I am using Netbeans 7.1)
1) Create a new Frame Class
The main reason why I chose to make a Frame class is that the JFrame can be considered to top container that can be used to add other objects. Also, I figure that I will use something similar to this in my CIV project and finding out how to create a frame that will be able to display multiple panels depending on the action is something on my top to do list.
2) After creating a new Frame class, if you look at the Navigator tab on the bottom left corner of Netbeans you should see something similar to the following image:
What we want to do now is create multiple frames within the JFrame component.
3) I will create two top level panels within the JFrame. The first panel will hold only one button that we will use to change the panels within the secondary top level panel. The second top level panel will contain all the panels that will be shown when clicking the button from the first panel. It will in the end look something like:
Things to notice in the previous image:
Coming from the JFrame container I created two panels, bottomPanel and topPanel. The top panel will be used to hold the button and that is it. The bottom panel will contain several other panels that we will swap around usign CardLayout. When creating the panels, ensure that the component tree of the navigator contains exactly the same type of panels under the frames.
We want
Jframe
- Top Panel
- Bottom Panel
and not
JFrame
- Top Panel
- Bottom Panel
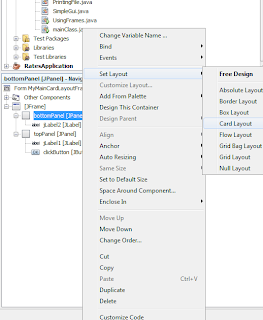
4) To get the layout of the bottom panel to be of CardLayout, you would have to right click on the bottom panel icon on the navigator tab and then choose "set Layout -> Card Layout"
5) Now, we would like to put two panels inside the bottom panel, be sure that the bottom panel is selected and then add two more panels. I removed the jLabel 2 as it was no longer required and I added that just to distinguish between the top panel and bottom panel earlier. The result should look something like:
As can be seen, I differentiated between the insidePanelOne and insidePanelTwo by changing the colors of the panels. This can be done from the properties tab at the right hand side of the screen if you click on the panel.
6) Adding the Code to the click button:
As the panels are now set and ready under the CardLayout format, we can just add the following code to the buttons' action event performed. You can do this in net beans just by double clicking on the the 'click' button and it would automatically create the clickButtonActionPerformed event for you. Add the following code so it looks like:
private void clickButtonActionPerformed(java.awt.event.ActionEvent evt) {
// TODO add your handling code here:
CardLayout cl = (CardLayout)(bottomPanel.getLayout());
cl.next(bottomPanel);
}
cl.next(bottomPanel); tells the java compiler to show the next panels in the CardLayout. Since we have only two panels, it should show the red or grey panels whenever you click the button. 'bottomPanel' has to be the variable of the bottom panel that was set earlier
CardLayout cl = (CardLayout)(bottomPanel.getLayout()); line just creates the CardLayout and gets the layout from the bottomPanel.
6) That's it. If it is done correctly, when the "click" button is clicked, the bottom panel should swap from red to green as it swaps panel.


This tutorial was the most useful that I have found on CardLayout in Netbeans, Thanks Samuel!
ReplyDeleteThanks very much Samuel. Was very useful
ReplyDeleteThank you very much Samuel, u Just solve a puzzle for me
ReplyDeleteThank you very much!
ReplyDelete