Friday, August 10, 2012
Blog Posting
It's actually quite difficult to have a continuous stream of daily posts. I will try again from today and put in more effort for this java blog.
Saturday, May 12, 2012
What is an instance?
An instance is created from a class. The class can be seen as a blueprint and the instance is the actual object that is created from the blueprint. The class can make several objects or instances with different attributes. A Car Class would be able to have different instances for example, such as BMW, Honda, Jaguar, Mercedes.
In my own words,
an instance is a particular case in which an object is created from a set of defined attributes and functions from a blueprint or class.
In my own words,
an instance is a particular case in which an object is created from a set of defined attributes and functions from a blueprint or class.
Friday, May 11, 2012
What is a class?
A class is a blueprint or a model on which individual objects or instances can be created. A class will contain variables, methods that describe its behaviours. A class usually represents a blueprint of a real-life object that needs to be represented.
Example: The car Honda can be an instance of a Car class. It will have its own set of properties includign the color, model, design, number of doors etc. The instance, Honda, will have different properties than another instance of the car class, Ferrari for example.
12/5/12 Edit:
A class is a blueprint that contains attributes and functions that will be used to create instances as a representation of something.
Wednesday, May 9, 2012
Download Scheduler Release
I have completed my download scheduler and am quite pleased with it. The link is below:
http://www.mediafire.com/?uk8050sva9niw2n
It is a simple download scheduler that can set the time of when files should be downloaded. In order to use the download scheduler java must be insttalled. The urls must be inputted properly with "http://" set in the beginning.
http://www.mediafire.com/?uk8050sva9niw2n
It is a simple download scheduler that can set the time of when files should be downloaded. In order to use the download scheduler java must be insttalled. The urls must be inputted properly with "http://" set in the beginning.
Monday, May 7, 2012
Jar Errors
Unfortunately, using netbeans, I keep getting a class not found error. I think this is because I have not set the class properly in netbeans as I use a different folder than the normal default one. I have uploaded another jar file that uses the default netbeans settings and I will test with this to see if i can get the problem resolved
http://www.mediafire.com/?44dv3qx2zwjhfmi
http://www.mediafire.com/?44dv3qx2zwjhfmi
Download Scheduler
I have finished my Download Scheduler. I am quite happy with it as I have used it several times to download files during my internet provider's off peak periods. The link for my program is
http://www.mediafire.com/?nr14ay62e0do053
I will post more details during the week. I am uploading this and I will test it on my friend's computer.
http://www.mediafire.com/?nr14ay62e0do053
I will post more details during the week. I am uploading this and I will test it on my friend's computer.
Sunday, May 6, 2012
JAR and File Associations
I have finished my program and I wanted to create a Jar file using netbeans. Everything seems to be working fine when I run the jar file from the command prompt. However, when I decide to double click the jar file in the hopes of having the program run properly, an error came up saying that java was unable to find the specified main class. After googling around I found that the solution to this problem is because the file type associations is not set properly. As I am using windows 64 bit, I would have to use the proper file type associations.
I needed to go to
HKEY_LOCAL_MACHINE\SOFTWARE\Classes\jarfile\shell\open\command
and changed the value from the original to
"C:\Program Files\Java\jre7\bin\javaw.exe" -jar "%1" %*
Originally it was something along the likes of
"C:\Program Files (x86)\Java\jre6\bin\javaw.exe" -jar "%1" %*
Not only was it using the previous version of jre, jre 6, but it was also using the 32 bit version. I suppose this is what caused the error as now it works completely fine
Saturday, May 5, 2012
Updates
It has been ages since I last posted. I have learned that it's extremely hard to update a blog frequently. I have been steady in my progress to learn Java but i have not had the time to update this blog. I will try to update this blog more frequently. At the moment, I am working on and have almost finished a download scheduler. I will post up the details in the coming week.
Saturday, February 18, 2012
Using Netbeans to Create a CardLayout V2
In the previous post, I went to great length to write a tutorial on how to use CardLayout in Netbeans. when it came to choosing which panels to use, I just chose the next panel that is within the bottomPanel.

private void clickButtonActionPerformed(java.awt.event.ActionEvent evt) {
// TODO add your handling code here:
CardLayout cl = (CardLayout)(bottomPanel.getLayout());
cl.next(bottomPanel);
}
If you want to choose which panel would be shown, all you have to do is just change the cl.next(bottomPanel) to
cl.show(bottomPanel,"card4");
so the previous method will become:
private void clickButtonActionPerformed(java.awt.event.ActionEvent evt) {
// TODO add your handling code here:
CardLayout cl = (CardLayout)(bottomPanel.getLayout());
cl.show(bottomPanel,"card4");
}
"card4" is the name of the panel that is red for me. It might be different for you but essentially you have to put the layout name of the panel you want to show. Note that the layout name of the panel might be different from the name of the panel that you set it to. The layout name of the panel will be under the properties tab on the right hand of the screen.

Using Netbeans to Create a CardLayout
CardLayout is a layout that is nice to use if you would like panels to appear depending on the action that you choose. For example, I would like for panel 1 to appear when button 1 is clicked and for panel 2 to appear when button two is clicked. When designing it without the use of Netbeans, the tutorial:
http://docs.oracle.com/javase/tutorial/uiswing/layout/card.html
can be followed easily. When it comes to Netbeans, I couldnt figure out how to use the panels within a frame and how to get it to work properly. This post will be try to teach you the following steps on how to get CardLayout working for a specific panel. Hopefully, this guide will be beneficial to the readers.
The basic steps in creating CardLayout in Netbeans are:
1) Create a Main Panel in which to hold other panels for the CardLayout
2) Create several panels within this Main Panel
3) insert code so that when a button or an action is generated, the panels are swapped
The more elaborate steps are as follow: (Note: I am using Netbeans 7.1)
1) Create a new Frame Class

The main reason why I chose to make a Frame class is that the JFrame can be considered to top container that can be used to add other objects. Also, I figure that I will use something similar to this in my CIV project and finding out how to create a frame that will be able to display multiple panels depending on the action is something on my top to do list.
2) After creating a new Frame class, if you look at the Navigator tab on the bottom left corner of Netbeans you should see something similar to the following image:

What we want to do now is create multiple frames within the JFrame component.
3) I will create two top level panels within the JFrame. The first panel will hold only one button that we will use to change the panels within the secondary top level panel. The second top level panel will contain all the panels that will be shown when clicking the button from the first panel. It will in the end look something like:

Things to notice in the previous image:
Coming from the JFrame container I created two panels, bottomPanel and topPanel. The top panel will be used to hold the button and that is it. The bottom panel will contain several other panels that we will swap around usign CardLayout. When creating the panels, ensure that the component tree of the navigator contains exactly the same type of panels under the frames.
We want
Jframe
- Top Panel
- Bottom Panel
and not
JFrame
- Top Panel
- Bottom Panel
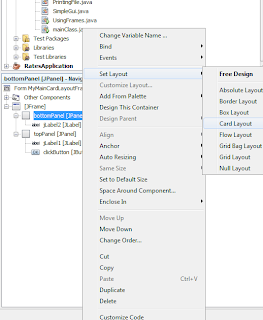
4) To get the layout of the bottom panel to be of CardLayout, you would have to right click on the bottom panel icon on the navigator tab and then choose "set Layout -> Card Layout"

5) Now, we would like to put two panels inside the bottom panel, be sure that the bottom panel is selected and then add two more panels. I removed the jLabel 2 as it was no longer required and I added that just to distinguish between the top panel and bottom panel earlier. The result should look something like:


As can be seen, I differentiated between the insidePanelOne and insidePanelTwo by changing the colors of the panels. This can be done from the properties tab at the right hand side of the screen if you click on the panel.
6) Adding the Code to the click button:
As the panels are now set and ready under the CardLayout format, we can just add the following code to the buttons' action event performed. You can do this in net beans just by double clicking on the the 'click' button and it would automatically create the clickButtonActionPerformed event for you. Add the following code so it looks like:
private void clickButtonActionPerformed(java.awt.event.ActionEvent evt) {
// TODO add your handling code here:
CardLayout cl = (CardLayout)(bottomPanel.getLayout());
cl.next(bottomPanel);
}
cl.next(bottomPanel); tells the java compiler to show the next panels in the CardLayout. Since we have only two panels, it should show the red or grey panels whenever you click the button. 'bottomPanel' has to be the variable of the bottom panel that was set earlier
CardLayout cl = (CardLayout)(bottomPanel.getLayout()); line just creates the CardLayout and gets the layout from the bottomPanel.
6) That's it. If it is done correctly, when the "click" button is clicked, the bottom panel should swap from red to green as it swaps panel.
JPanels in JFrames Netbeans
When using Netbeans, how can someone put a JPanel inside a JFrame. I have been trying different methods to put a JPanel class that I created into a JFrame class that was made from Netbeans. Unfortunately, as Netbeans do a lot of background programming and packing at the end, I was unable to do it manually using simple commands such as add(container panel) ..
It turns out, the simplest way to add a panel into a Netbeans JFrame is to drag it from the left hand side of the screen to the JFrame dialog on the right hand of the screen. Go Figure ... >.>
It turns out, the simplest way to add a panel into a Netbeans JFrame is to drag it from the left hand side of the screen to the JFrame dialog on the right hand of the screen. Go Figure ... >.>
JPanels and JFrames
I have been working on how to use JPanels within a Jframe. It is quite confusing for me in the beginning as I had no idea how to start and what to import or initialize. After a while I decided to create a simple class to test Jframes and JPanels
/*
* To change this template, choose Tools | Templates
* and open the template in the editor.
*/
package javarefresher;
import javax.swing.JButton;
import javax.swing.JFrame;
import javax.swing.JPanel;
/**
*
* @author Samuel Tambunan
*/
public class UsingFrames {
public static void main(String []args) {
System.out.println("Hoi");
MyFrame mf = new MyFrame();
MyPanel mp = new MyPanel();
mf.add(mp);
mf.pack();
mf.setLocationRelativeTo(null);
mf.setVisible(true);
}
}
class MyFrame extends JFrame {
public MyFrame() {
/*MyPanel mp = new MyPanel();
add(mp);
pack();
setLocationRelativeTo(null);
setSize(300,200);
setVisible(true);
*/
}
}
class MyPanel extends JPanel {
public MyPanel(){
JButton ok = new JButton("OK");
add(ok);
}
}
the simple java class above demonstrates how to use a Jpanel and a JFrame if it is being called from a third separate class. One thing I noticed when doing this is that the mf.pack() must be called or otherwise the buttons will not show up properly. The method, is inherited from the Windows Java API and essentially "causes the frame window and its object to fit the preferred size and layout". It is also important to show the frame by giving the command "mf.setVisible(true)" or otherwise it will be empty.
My next step will be to try to create a Jpanel and Jframe using Netbeans and then packing them together. This will be considerably harder as the positioning of the panels is what is causing me to get headaches at the moment.
Friday, February 17, 2012
Rates Application File
I know I have not finished the CIV files yet but I am moving on to creating a new project, a Rates Application program. This will be a simple software that would consist of three panes. The first pane would only consist of two buttons, a BUY button and a SELL button. Clicking on these panes would redirect you to a their respective pages. Both panes will be quite similar in and at the moment this application would only support one buy or sell function.
Each pane will consist of a drop down list that contains all the available currencies that will be used. Then the user would be able to type how much of the currency that they are going to sell/buy. It will be able to calculate the total amount required and then print the receipt.
Key Requirements
1) Able to print Receipt
2) Buy Pane would consist of an extra input field to show how much money has been taken and how much would be needed to be returned
3) Able to store the rates so that each time a new customer comes, there is no reason to input the rates over again.
In the end it will look something like ( only better):

The first panel will consist of just two buttons that will either redirect it to either this buy panel or redirect it to the sell panel. In order to do this, I will have to use the cardlayout method for java.
Thats all for now.. I'll update more when I feel like it
Each pane will consist of a drop down list that contains all the available currencies that will be used. Then the user would be able to type how much of the currency that they are going to sell/buy. It will be able to calculate the total amount required and then print the receipt.
Key Requirements
1) Able to print Receipt
2) Buy Pane would consist of an extra input field to show how much money has been taken and how much would be needed to be returned
3) Able to store the rates so that each time a new customer comes, there is no reason to input the rates over again.
In the end it will look something like ( only better):

Thats all for now.. I'll update more when I feel like it
Monday, February 13, 2012
What is a Class?
While going to work today, I was reading up on some java questions that interviewers like to ask. The first question, What is a class?, caught me off guard as it has been a long time since I had to formally define what a class is. I figure that the best way for me to re learn all of this is to answer the questions using my own definitions and words.
What is a class?
Looking at the Head First Java Book, I came upon definitions and examples of what is in a class, but not exactly what a class is in terms of object oriented programming. "A class has one or more methods" is an explanation of what goes into a class but not necessarily the definition that I think would serve me well.
Going to the Java online web pages, I found a definition stating that a class can be used to create "an instance of the class of objects". What I would take away from this definition is that a class be considered a blueprint that can be used to make "copies" or instances.
An app that I read said that a class is a "template for a set of objects that share a common structure and common behavior".
I like that definition and I think by summing up all the definitions above, I can produce my own definition that would always be ingrained in my mind, as I took time to find and read several definitions before summing it up on my own words.
What is a class?
A class is a blueprint that is used to create objects or instances that are similar in structure and common behavior. An example of a class is the Car class. All cars would have wheels, doors, windows and hence these attributes can be defined in the class as variables. The number of doors and windows might be different for each "instance" or "type" of car manufactured.
I like creating a post about OOP concepts every now and again to refresh my memory. That's all for now :D
What is a class?
Looking at the Head First Java Book, I came upon definitions and examples of what is in a class, but not exactly what a class is in terms of object oriented programming. "A class has one or more methods" is an explanation of what goes into a class but not necessarily the definition that I think would serve me well.
Going to the Java online web pages, I found a definition stating that a class can be used to create "an instance of the class of objects". What I would take away from this definition is that a class be considered a blueprint that can be used to make "copies" or instances.
An app that I read said that a class is a "template for a set of objects that share a common structure and common behavior".
I like that definition and I think by summing up all the definitions above, I can produce my own definition that would always be ingrained in my mind, as I took time to find and read several definitions before summing it up on my own words.
What is a class?
A class is a blueprint that is used to create objects or instances that are similar in structure and common behavior. An example of a class is the Car class. All cars would have wheels, doors, windows and hence these attributes can be defined in the class as variables. The number of doors and windows might be different for each "instance" or "type" of car manufactured.
I like creating a post about OOP concepts every now and again to refresh my memory. That's all for now :D
Saturday, February 11, 2012
Java Compiling
I got so engrossed in watching movies and playing games yesterday that I did not get back to the blog and learn how to use CardLayout :S. Watching too many movies can be quite taxing on the mind as I felt that I did not achieve much during the day :S. Oh well, what's done is done and its back to business. This time I am going to blog about Java compiling using the -d (directory) flag.
Because I have been using Netbeans all this time, I learned that even though Netbeans made many things easier, it is not the best way to relearn or learn Java. The directories and java paths and imports when creating through Netbeans are all managed automatically and while this would make it easier for Java Developers, I feel that while re-learning Java, it would be better to go back to the basics of using command line and understanding what is happening. This post will be dedicated to simple compiling of java, especially with the directory flag.
When it comes to making my own project I have decided to start using packages when it comes to my java files. I will try to compile each java file under the general packages of "net.sambel.samuel.tambunan.***" where *** are the package names. So for example, if MyApp is a package and MyAppClass is the first java class in the package, i would have to run it under
javac net/sambel/samuel/tambunan/MyApp/*.java;
When using the -d (directory) flag,
I can type javac -d ../classes net/sambel/samuel/tambunan/MyApp/*.java
to compile everything from inside net/sambel/samuel/tambunan/MyApp/*.java and put all the compiled classes into a separate folder in
classes/net/sambel/samuel/tambunan/MyApp
This would help me keep all my java source codes in a separate folder form my classes files.
So my overall directories would look in the end like
MyProject -> source ->net -> sambel -> samuel -> tambunan ->MyApp -> ***.java
-> classes ->net -> sambel -> samuel -> tambunan ->MyApp -> ***.class
NOTE: when compiling using:
javac net/sambel/samuel/tambunan/MyApp/*.java;
be sure that you are inside the source directory.
Friday, February 10, 2012
Card Layout
I have been wondering how I would be able to move from one frame to another using a button. At the moment, the way I have been doing it is by hiding this frame, the frame that is currently showing by this.setVisible(false), and creating a new frame by using new BuyRatesFrame().setVisible(true);
Although this technically works, it is not the best method that should be used when traversing between panels.
While googling on more efficient methods, I stumbled upon Card Layout.
I will update more after finishing a game that I'm playing. :D
Although this technically works, it is not the best method that should be used when traversing between panels.
While googling on more efficient methods, I stumbled upon Card Layout.
I will update more after finishing a game that I'm playing. :D
Thursday, February 9, 2012
Android
It has been ages since I last posted. I will try to post everyday and learn regard in by Java but it is quite hard. For now I will just post something I learned regarding android. The baseman version of an android is what will be used to connect the phone with the provider. It is used for communication and even if the version number of the baseband is different than the kernel, it will still work
Saturday, February 4, 2012
Printing v2
Printing in Java as we learned earlier requires the Printable implementation. One line of code caught my eye that I believe I need to fully understand.
Graphics g;
Graphics2D g2d = (Graphics2D) g;
As my java is a bit rusty I fully intend to learn this. From what I have garnered so far, it is just a simple casting from the Graphics object to a Graphics2D object. Hmm. Graphics apparently is also abstract. I just looked it up on an API.
This kinda throws everything off for me a bit. I had assumed that since Graphics g was a command it would not be abstract.
However I now realize, it is created but not initialized so it still would work, since we only declared it but not initialzied it.
Graphics g = new Graphics() would obviously fail, now I understand that.
Then how could the line
g2d.translate(tx,ty); be called??
... Okay I feel silly. Apparently I mistook interfaces with Abstract Classes. Interfaces are abstract classes in which all the methods are abstract. With an abstract class, you can make it such that only some of the methods are abstract and some aren't.
Printing in Java
Printing in Java is something I have not done previously. In order to print using Java, I would have to implement the Printable and ActionListener class.
The code and examples for printing in java can be found in the Oracle website.
Printing has to be done using the Graphics class
Steps to printing in Java
There are basically two tasks that must be done for printing
1) The first task is for creating the jobs that must be printed. What items needs to be printed and the number of copies and associations with a printer
2) Drawing the content of the page must be done as the second step in order to print
1) Importation of a Print class must be done. PrintJob is what is going to be used to print the items In Java
import java.awt.print.*;
That must be done in order for the print functions to work
PrinterJob pj = PrinterJob.getPrinterJob();
Now the statement above will return a PrinterJob that is associated with the default printer. As it is an abstract class, PrinterJob will not be able to initialized. Hence, the statement above is a way to get PrinterJob object.
The printable class is an interface that is implemented by the print methods.
It will be used by using Printable.print(..)
TIP: Ensure that Graphics g and PageFormat pf has the correct syntax and capitalization. As Pageformat is obviously different than PageFormat but its easy to miss sometimes.
When using the Printable, the PageFormat object must be used as well. This class is used for the page orientation, size, imaginable units.
public int print(Graphics graphics, PageFormat pageFormat, int pageIndex) throws PrinterException {
/* We want to only print the first page so anything above zero
* is not required
*/
if (pageIndex > 0 ) {
return NO_SUCH_PAGE;
}
/* We have to translate the X and Y values in the PageFormat
* to avoid clipping
*/
Graphics2D g2d = (Graphics2D)graphics;
g2d.translate(pageFormat.getImageableX(), pageFormat.getImageableY());
graphics.drawString("Hello World!", 100, 100);
return PAGE_EXISTS;
}
Notice that
Graphics2D g2d = (Graphics2D) graphics;
where Graphcis2D g2d is an abstract class.
Thursday, February 2, 2012
CIV v2 Databases
In order for the program to be able to save past history, I need to make a database.
The database will be quite simple. It needs to just store the amount of money that is still currently available.
So the columns of the database will be as follows
Date
User
twodollars
oneDollar
fiftyCents
twentyCents
tenCents
fiveCents
-- a Date is needed because we want to know what time the money was taken out of the system
-- the user is required because we want to know who is taking the money
Also we need to make sure an ID is available.
The SQL Command that I used is
create table civtable (
id integer primary key generated always as identity,
username varchar(30),
twodollars int,
onedollar int,
fiftycents int,
twentycents int,
tencents int,
fivecents int
);
CIV
I am trying to start a new project. This project is named the CIV project. Basically, all this project does is maintain a database and a list of coins. It is a small version of a book keeping diary. Perhaps a picture is worth a thousand words so the following is the CIV program that I have started to make.


As can be seen form the image above, the software will add the number of coins that is taken. So basically, for example, if I have with me 50 dollar worth of $2 coins, I can click the $2 button and take it out. I haven't implemented the buttons to take out the coins yet. At the moment all I have done is create the GUI.
-- To update all the fields, I have decided that instead of updating one by one when I click the button, I create another method where it will update every field. I have stored values at the moment using integers. For example:
int stackTwoDollars =0;
int stackOneDollar =0;
For now, I will be happy with starting with zero just to make sure it works. Later on I plan to connect it to a database so that the values from the previous time that money was taken out can be saved.
private void updateFields() {
twoDollarsField.setText(""+stackTwoDollars);
oneDollarField.setText(""+stackOneDollar);
fiftyCentsField.setText(""+stackFiftyCents);
twentyCentsField.setText(""+stackTwentyCents);
tenCentsField.setText(""+stackTenCents);
fiveCentsField.setText(""+stackFiveCents);
}
The code above is used to update and refresh all the fields;
Annotations
Annotations are important nowadays. When I started learning Java, annotations have not been implemented yet. Nowadays, annotations are everywhere and it will be silly if I did not at least learn about it.
Annotations ( from the Java Tutorials)
- It is used as information for the compiler - can be used to detect errors or suppress warnings
- Can be sued to generate code, xml files
- runtime processing annotations are available to be examined at runtime.
Java Annotations can be used with Java Persistence. However, I am still unsure how to do this.
Subscribe to:
Comments (Atom)